For the second part of the Wild Kingdom brief, myself and classmate Emily will become lead designers when we swap the designs of one of our looks. We will then teach each other how to create the look just as we did it ourselves.
So far I have found this part of the project exciting and a great learning experience as not only am I learning Emily's design and how to take instruction, I am also learning how to give instruction and how crucial it is that this must be descriptive/thorough so that Emily is prepared enough.
Emily and I have discussed both of our designs together and have decided
to swap/teach our Editorial designs to one another. We have talked through our
designs and given each other advice for when we have to create these looks in
the assessment.
This advice included Emily explaining I must conceal any spots and apply
a thin layer of foundation before adding the red powder as she found the powder
took better and appeared a smoother consistency when she did this. Another tip
was to make sure I had the correct hair texture before working on the hair. For
Emily's look wavy/curled hair works best and if my models hair lacks in this
way she explained I may have to crimp and spray my models hair first. Emily has
also provided me with a list of products I will need, Pictures of her shoot so
I know what I'm aiming for, a Face Chart and a detailed Step by Step to help me
with the look and my time management during the Timed Assessment.
Whilst
I explained to Emily whilst doing the plaits, she will need to continuously
check if the wire is inside the plait and that plait and wire move as one. I
explained that if the two come apart Emily will have to wrap sections of hair
round the wire as she goes. I also explained if the plaits fell she may have to
cross grip the base of the plait to the head, to ensure they stand upright.
We
also gave one another photographs of our shoots and a face chart, explaining
both the hair and makeup design and I feel these combined really helped me to
visualise Emily’s look and I hope she found the same. Along with this we
swapped ‘Step by Step’ sheets. This was helpful as if we had forgotten what was
discussed when we met up, we still had this sheet to help us through or remind
us of what to do next etc.
I
believe we were both keen to carry out our assessments and I enjoyed working
with Emily, as she was always contactable and happy to meet or help anyway she
could. I think we managed the assessment professionally and to a high standard,
though I may need to work on my application of rice.
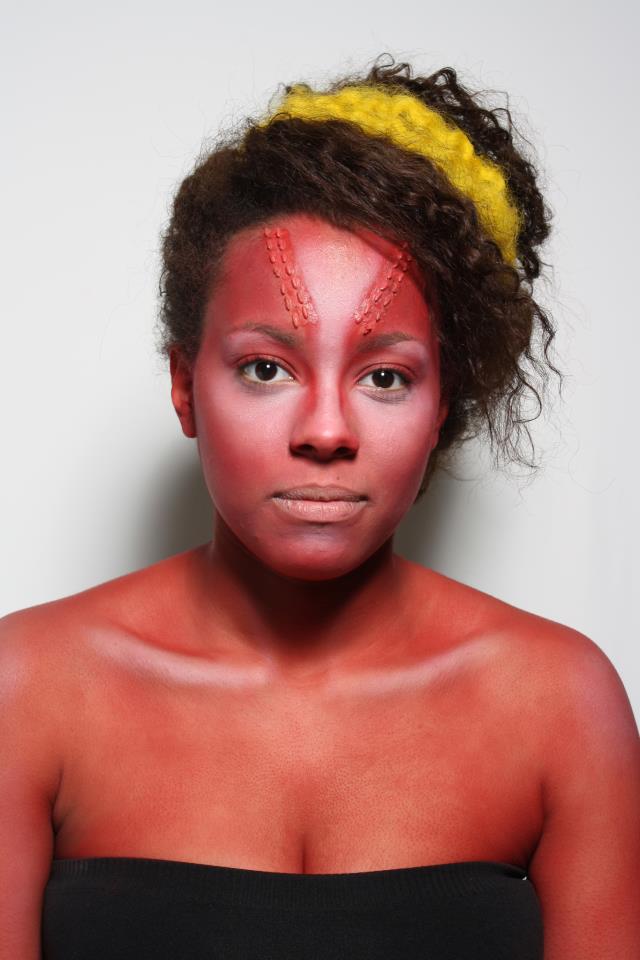
(Below I have attached what Emily provided me with)
Emily's Photoshoot:
Emily’s Editorial Design Step by Step:
Timed Assessment- Wild Kingdom
1.
Make sure skin is clean of makeup
2. Conceal any spots and apply a thin base of foundation, I found this helped
even out skin tone
3. Mix liquid latex and rice together and start applying to the forehead,
making sure they are even. I tried to use a similar amount of rice grains for
each line. And make sure they reach the hair line. Using a spatula to
straighten/neaten up and allow to dry
4. Start applying daemon illamasqua red eye shadow to the skin; this will be
applied to face, ears, neck, arms, chest and top of back. Circular motions I found
easier with the big illamasqua one or the blusher brush.
5. Apply lightly in the areas which will be strongly contoured
6. Build up until you get a strong overall colour
7. Blend around the eyes to add shading and down the sides of the nose, no
makeup applied to the eyes
8.Colour
over the lips and over the eyebrows leaving natural eyebrow colour coming
through.
9. Use the white powder from the screenface eye shadow palette to contour the
skin in strong areas which catch the light (collarbones, shoulders, top of
cheeks, t-zone etc)
10. Make sure the colour goes over the rice properly, using a smaller brush to
go around the edges
11. Using a big doughnut for the hair place it at the back of the head and pin
into place (before this if texture needs to be added to the hair you could
crimp it).
12. Wrap hair around the doughnut, not tightly because it doesn’t need to be
slicked back it needs to have volume. Leave the front bit of the hair out of
the bun.
13. Get some yellow crepe hair and pin in place on one side and then bring it
round to flow in with the bit of hair left out. (Bit difficult to explain but
when you look at the picture hopefully it will make sense!)
Face chart:

(Below is what I gave Emily, along with a series of images from my photoshoot)
My Step by Step:
1.
Cleanse, Tone and moisturise the face, neck and
shoulders.
2.
Starting with the hair, take a small section of
hair from above the ear on each side, approx 2cm x 2cm and gel into twists.
(Let these hang loose whilst rest of look is completed, these twists will
become hoops at the end)
3.
Then, gel all remaining hair into two even, high
pigtails, with a straight parting down the centre of the head.
4.
While gel is out, gel eyebrows flat to the face,
brushing upwards using a disposable mascara wand, for a spiky effect brow.
5.
Wipe away any excess gel, as this could effect
how clean the makeup looks later.
6.
Lightly spray pigtails, so they feel slightly
textured but do not appear shiny. (As this will make the hair easier to work
with)
7.
Part each pigtail into two sections, hook in the
end of the wire by about an inch; into the gap of the parted hair. (Keep the
two sections separate as you do this if possible as these sections will form
the plaits) Wrap/loop the wire round the hair bands. *Being careful not to stab
models head*There should be a short piece of wire sticking out, twist this
round the longer, hair length, piece of wire so no spikes of wire can dig in or
harm models head. *Be careful whilst doing this that the wire doesn’t poke your
model in the eye etc.*
8.
Fishtail plait the two sections of hair round
the wire. Every few strands of hair check that the wire is actually inside the
plait and the plait isn’t just sitting on top of the wire, as the plait won’t
bend how you want it to. If this happens, loop the strands of hair round the
wire as you go. *If this doesn’t make sense I can show you what I mean*
9.
Finish of the plaits by tightly tying with thin
hair bands, close to the colour of the models hair. And if wire sticks out the
end trim accordingly with the wire cutters.
1.
Try bending the plaits into shape, if they fall
or do not stand upright cross grip the bottom of the plaits to a suitable place
on top of the head. Do this until they are supported well enough not to move.
1.
Then add Fullers earth to the front section of
the head into a triangle/pyramid shape. If there are lots of cross grips,
Fullers Earth over these so the overlook will look more professional.
1.
As Fullers Earth dries, add split peas to the
forehead/hairline using latex. I found it best to start with the row of four
split peas in the centre of the head and then I worked outwards.
1.
As latex dries carve circles into the Fullers
Earth using the end of pintail comb. There should be three rows of circles;
that narrow towards the point of Fullers Earth.
1.
Then dry latex with the hairdryer on a cool
setting, not to burn the model.
1.
Once happy that the latex is dry, use Illamasqua
foundations to create a natural skin base for the face and ears, going over the
split peas, to create an even coverage over the whole face. (The neck can be
left clean as it is going to be painted red).
1.
Powder using Illamasqua Loose Powder.
1.
Contour cheeks and temples with Illamasqua
powder blush in Disobey.
1.
Highlight the nose and cheekbones with nude
powder from Screenface powder palette.
1.
Contour and highlight the eyes using the
Screenface powder palette. Use brown to contour the eye socket and white/nude
to highlight the brow bone and eyelid.
2.
Use dark red Aquacolour mixed with water to form
a thick paste for an intense red and draw along, under the jaw line, round the
back of the ears and down and along the hairline at the nape of the neck.
Continue the Aquacolour down, finishing at the bottom of the neck and across
the very top of the shoulders. (See pictures from photo shoot)
2.
At the front, continue the Aquacolour down the
neck and across the top of chest. (At front and back Aquacolour should finish
in a clean straight line across the top of the back and the mid chest)
2.
Connect Aquacolour at the side/top of the arms
to form a point just below the shoulders on the sides of the arms. (See
pictures from photo shoot)
2.
Leave Aquacolour to dry and apply Illamasqua
Precision ink in red/black to draw dots onto the split peas to resemble
Aboriginal patterns.
2.
Still with the Precision ink, draw two dashes on
each cheek; dashes should be in line with models eyes if the look straight at
you and the dashes nearer the nose should be twice as thick as the dashes
further away from the nose, i.e. they mirror each other. Each dash should be
about 1.5cm long.
2.
Using Precision ink by drawing lines into the
eyebrows, to emphasise the spiky/slashed eyebrow effect. (About 10-12 flicks
per brow, evenly spaced, depending on models brow width)
2.
Once the Aquacolour is dry, finish using the
Precision ink by dashing horizontally down the middle, back of the neck. (See
Back View Face chart) And dash vertically down the body where the Aquacolour
meets the skin on the chest, tops of arms and back/neck, as if stitching on the
Aquacolour. Each dash being approx. 1 cm apart and 1-2cms long. (See pictures
from photo shoot).
2.
Colour the lips with red/orange from the Kryolan
mini Lip palette. Colour lips to their natural shape.
2.
Lastly, spray Fullers Earth gold with gold
hairspray, shielding the rest of the model and the make-up and hair.
2.
If the carved out circles in the Fullers Earth
are no longer visible, colour them in with dark red Aquacolour.
3.
Finally, style the look by clipping the gel
twists and strips of blonde hair weft into a hoop shape above the ear, just
below the base of the wired plaits. (See pictures from photo shoot)
3.
Bend fishtail plaits into the desired shape,
plaits should curve up, out, up and out at the very ends, (the back view
picture shows this shape best)
3.
Spray the backs of the plaits gold with gold
hairspray, finish by spraying in a straight line across where the two hair
bands at the base of the plaits meet, making sure you shield the rest of the
hair/make-up.
3.
When happy place on the styling bib/chest piece,
and tie at the back into a big bow which should sit on the line on Aquacolour,
so that above the bow is red Aquacolour and any skin below the bow is clean.
My Face Charts: